
Your Ledger Nano S looks perfectly normal. It has the correct logo, it starts as expected, and Ledger’s software says it is genuine. Does that prove nobody has modified the electronic board inside? No. The Genuine Check authenticates the Secure Element, not every component connected to it. In principle, a genuine Ledger can contain unauthorized additional hardware and still pass the official software test. Ledger states that limitation explicitly in its security team’s threat model.
So how can you examine your own device? In this guide, we’ll show you how to check an original Ledger Nano S for signs of physical tampering, using photographs and published hardware-implant investigations.
There is an important distinction in the examples: the widely documented display-monitoring implant research concerns the
edger Nano X. The evidence illustrates an attack that a genuine-chip check cannot rule out, but it is not proof that the same implant was found inside an original Nano S. Likewise, the October 2026 CryptoBilis reporting does not by itself establish that the original Nano S model was affected.
This article is specific to the Ledger Nano S, not the Nano S Plus or Nano X. Their boards are different. If you only want to confirm whether your wallet is a real Ledger, first read How to Check if Your Ledger Nano S Is Genuine.
This article answers the next question: has somebody physically changed it?
1. What does a tampered Ledger Nano S look like?
A modified hardware wallet could be altered in several ways. Somebody might replace a component, attach a small printed circuit board, connect extra wires to the display, change the USB interface, or hide a flexible circuit inside the case. An implant could also be much less obvious than a large board visible at first glance.
The possible purposes differ. For example, one type of attack might imitate a keyboard or storage device over USB to trick you into installing malicious software. Another could monitor information sent to a display, where recovery words or transaction information are shown. These are distinct attack designs, not evidence that a specific Nano S in front of you contains either one.
Start by understanding what the original board should look like. An unfamiliar layout does not automatically mean an attack.
Ledger manufactured the Nano S with several genuine hardware revisions.
Fast inspection checklist
- Establish where the device was purchased, and whether it has ever been repaired or opened.
- Photograph its outer case before inspection, including seams and the USB opening.
- Disconnect the device, open it only if you can do so without damaging the screen ribbon, and photograph the board.
- Compare the same side and revision with the reference PCB photographs below.
- Examine the display ribbon, USB connector, solder joints, integrated circuits and space underneath the display for
- unexpected hardware.
- Check the microcontroller markings and investigate unexplained components.
- Have a competent technician evaluate anything suspicious; visual inspection has limits.
2. Open your Ledger Nano S to inspect the hardware
For users who want to go further, the original Nano S can be visually inspected by opening its plastic enclosure. This is an advanced, optional check. Opening it introduces a risk of damaging the case, connectors, buttons, or display, and may affect warranty or return options.
First disconnect the USB cable and remove the metal swivel cover from the inspection area. Use a suitable thin plastic opening tool to release the plastic case clips gently. Once the cover is off, inspect the board without putting tension on the orange display ribbon cable.
You are looking at the PCB, which stands for printed circuit board. It is the small board holding the USB connector, integrated circuits, buttons, display connector and other electronic components.
If you are not accustomed to opening compact electronics, a technician familiar with PCB inspection can perform the visual check and photograph both sides. Even a trained visual inspection cannot guarantee that a sophisticated implant will be detected.
What should you look for?
Compare the device with the same hardware revision where possible. Look for the overall board layout and the location ofthe normal components, then pay particular attention to signs of added hardware:
- An unexplained electronic board, integrated circuit or module installed on top of the original PCB.
- Fine wires connected to unexpected points, especially around the display connector or USB connector.
- A flexible circuit, tape or dark coating concealing added electronics.
- Solder joints that look inconsistent with the rest of the board, or obviously cut and rerouted traces.
- A small antenna, a SIM/eSIM component, or a radio module that does not belong to the original Nano S design.
- Parts or wires sandwiched between the screen and the original PCB.
A strange-looking part is not automatically evidence of a hack. Ledger changed the Nano S design over time, and manufacturing glue, component markings and assembly details can vary. That is why reference photographs are essential.
3. Ledger Nano S PCB revisions: reference photographs
These are historical reference examples, not a guarantee that every later legitimate configuration is pictured. First step is to check the PCB against reference images below and looking for extra soldered components. That is a useful inspection method. Important: All revisions of the Ledger Nano S have a single printed circuit board (PCB). If you find a second circuit board when opening your device, this is a major RED FLAG and definitely indicate tampering.
Revisions 1 and 2
Revision 1 is a blue PCB with black glue. Revision 2 is a green PCB. Black or transparent glue could be used depending on the batch.


Notice that the different PCB color is normal. A green board is not automatically counterfeit, just as a blue board is not automatically genuine.
Revisions 3 and 4
Revision 3 as a blue PCB with black glue and revision 4 as a blue PCB with a hole with metal. The placement of components, openings and adhesive provides more useful reference points than the PCB color alone.


Revisions 5, 5 bis and 6
All three examples have a blue board, but they are not identical in appearance.


Revision 7
Revision 7 is the final revision of the Ledger Nano S. Notice the 15-pin display connector, compared to the 12-pin connector used in earlier revisions.

4. Check the Nano S microcontroller (MCU)
The original Nano S has more than one important chip. The Secure Element is responsible for protecting secrets and cryptographic operations, while the microcontroller (MCU) helps handle other device functions. The original Nano S uses an STM32F042K6-class MCU, and advises advanced inspectors to look for the marking 042K6, while noting that the full marking may vary. The MCU has a 32 KB flash capacity, unexpected replacement with more flash could be security-relevant.
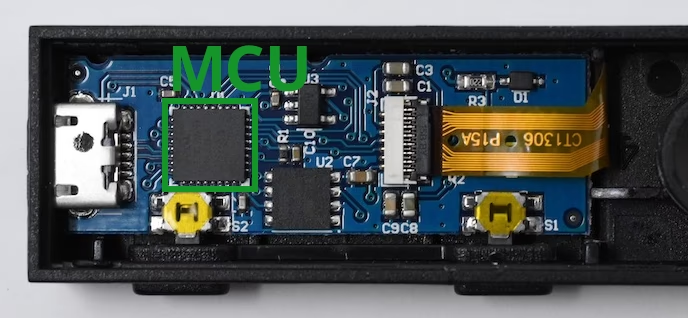
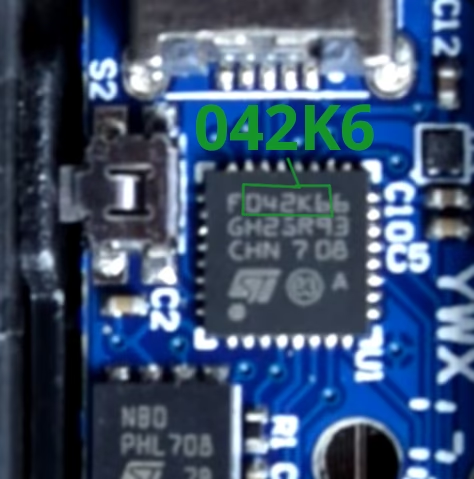
You may need a magnifying lens or a macro photograph to inspect the marking. Pay attention to signs that the chip has been replaced, but remember that markings can be difficult to photograph and that a genuine-looking marking can itself be imitated.
Why the MCU matters
There is a boot-time integrity check in which the Secure Element checks the MCU’s firmware. Ledger has also published a technical explanation of historical MCU integrity vulnerabilities and fixes.
This protects against certain types of modified firmware. It does not establish that every possible hardware addition, particularly one that only observes a display signal, will be detected at boot.
5. Check the display connector: 12-pin and 15-pin Nano S screens
This is another source of confusion when opening a Nano S. The original Nano S was produced with two screen connector variants: 12 pins and 15 pins. They look very similar from outside. The connector is hidden inside the enclosure, which means you usually need to open the device to identify the type.
Ledger Nano S 12 pins
Ledger Nano S 15 pins
The screen information is useful if your display is damaged or you want to check whether a replacement is compatible. A 12 pin screen does not prove a unit is genuine, and a 15-pin screen does not indicate a counterfeit. They are normal variations. There is also no basis for assuming that the two connector counts correspond one-to-one with the numbered PCB revisions above.
If you need a replacement, our guide to choosing the correct Ledger Nano S screen shows how to identify the connector. The replacement displays sold on Symetronix are compatible third-party parts, not official Ledger-branded screens, and are intended for the original Nano S rather than the Nano S Plus or Nano X.
A screen replacement by itself does not prove that somebody installed spying hardware. What matters in a tamper inspection is whether an unexpected component was connected to the circuitry and what that component does.
6. Real hardware tampering cases and what they prove
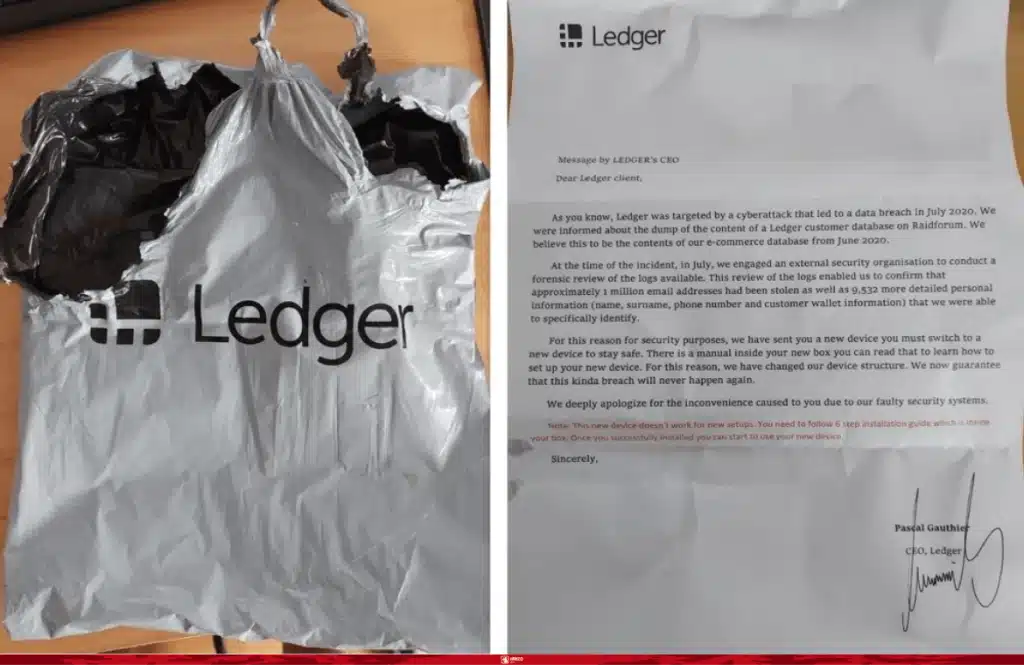
2021: a convincing replacement wallet concealed a USB attack
In 2021, an unsolicited wallet arrived with packaging and a letter designed to look as though they came from Ledger. Forbes and BleepingComputer described how the counterfeit package led to a USB-based malicious-software scheme. The documented example was not an original Nano S hardware implant; it demonstrates that an attractive case and a familiar brand do not validate the electronics inside.
Package and counterfeit Ledger replacement letter described in a historical scam
Screen-monitoring hardware implants: what the research shows
A separate and more sophisticated attack was investigated by hardware researcher Joe Grand and later described in a
detailed field report by Tibane Labs. These investigations concern the Ledger Nano X, not the original Nano S.
Additional circuit board and wiring photographed in Ledger’s hardware-tampering discussion
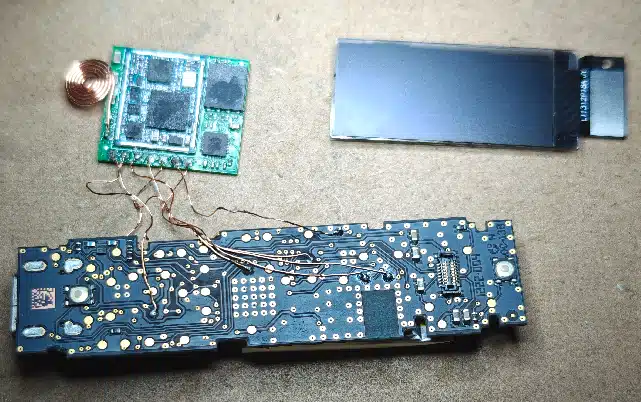
Image: A documented hardware-implant example. The photograph illustrates a Nano X modification; it is not a genuine
Nano S reference PCB. Source: Ledger.
In the investigated Nano X attack, unauthorized electronics observed the display communication. That data can reveal recovery words when they appear on screen, and the researched implant incorporated independent communication hardware to transmit information. The Secure Element itself could remain authentic, so a Genuine Check could still succeed.
Tibane Labs documents progressively less obvious implant designs, ranging from a hand-wired add-on board to compact
flexible circuitry concealed near or beneath the display. The study includes photographs of the internal components and
explains the distinction between protecting a cryptographic secret inside the Secure Element and exposing information after
it has been sent to a screen.
For close-up images of the later generations, see the Tibane Labs field report and Joe Grand’s hardware-implant research.
This research demonstrates a class of attack that a cryptographic genuineness check alone cannot rule out. It does not
mean those particular Nano X implants have been demonstrated inside a Nano S.
October 2026: the CryptoBilis investigation
In early October 2026, Ledger investigated cryptocurrency theft reports associated with CryptoBilis, a reseller in Southeast Asia. Ledger confirmed an unauthorized hardware implant in at least one affected device and asked the reseller to suspend sales during the investigation.
Some reports give large theft estimates derived from on-chain analysis, but these figures do not by themselves prove that every traced loss came from the same hardware implant. Separate reports also described a suspicious device reportedly purchased in Germany. As of this article’s 13 October 2026 editorial check, we did not establish an independent Ledger confirmation of that reported European case. See the Hungarian-language Hírnavigátor summary for the report; treat it as a report, not a verified finding.
For the reporting available at publication, see CoinDesk’s account of Ledger’s confirmation, YFarmX’s on-chain investigation, and Help Net Security’s distinction between confirmed and unconfirmed reports.
The practical consequence is clear: authentic chips and legitimate-looking packaging do not eliminate the need to consider supply-chain and physical tampering risks.
7. How to tell normal repairs from suspicious modifications
Many Nano S devices are several years old. Broken OLED displays are a common reason to open them, and the existence of a replacement screen does not make a wallet counterfeit.
A typical screen replacement involves changing the OLED module and attaching its ribbon cable to the existing connector. The original board, its microcontrollers and its normal components remain in place.
A tampering concern is different. For example, a hidden board connected to the display’s signals, an unfamiliar microcontroller, an unexplained antenna or extra wires should prompt a closer inspection. Whether such electronics are malicious depends on what they are and how they are connected; the visual appearance alone may not be conclusive.
If you are comparing two devices, try to compare the same PCB revision and the same side of the board. If there is a component you cannot identify, consider the device compromised.
8. What to do if you suspect your Nano S has been tampered with
The best response depends on whether the wallet already holds funds and whether the recovery phrase may have beenexposed.
If the device is new and contains no funds
Stop the setup process. Retain the box, receipt and any unusual instructions. Photograph the device and contact Ledger Support and the seller through a trusted channel. If the device is suspicious, replace it with one from a verifiable supply chain rather than trying to prove its safety solely by resetting it.
If funds are associated with a potentially compromised recovery phrase
Assume that any recovery phrase displayed on or entered into a suspicious wallet may already be known to someone else. Obtain a trusted wallet and create an entirely new recovery phrase using that trusted device. Verify the receiving addresses on the trusted device’s screen, then move the assets to addresses controlled by the new phrase. Account for token approvals, supported chains and transaction fees, and prioritize risk-sensitive transfers.
A factory reset of the suspicious device does not make a previously exposed recovery phrase secret again. Restoring the same phrase on another device also preserves that exposure.
If significant funds are involved or you cannot identify the correct migration steps, seek prompt help from a qualified, independent cryptocurrency security specialist. Never provide them with your recovery words.
If you are investigating a suspected physical implant
Preserve photographs of the device and the purchase history. A specialist can inspect the PCB for unexpected components and document findings. Share the details with Ledger’s official support or security channels. A successful Genuine Check should be reported accurately, but it does not cancel the evidence of suspicious hardware.
9. Frequently asked questions
Can a genuine Ledger Nano S be tampered with?
Yes. The Genuine Check authenticates the Secure Element, but that alone does not rule out added hardware outside the chip. Ledger’s own documentation identifies this limitation.
Does passing the Genuine Check prove my Nano S has no hardware implant?
No. Use the software test for authenticity, then evaluate supply-chain history and physical alterations separately when necessary. An inspected device with no visible anomalies still cannot be guaranteed free from every microscopic or concealed modification.
Is a green Ledger Nano S motherboard suspicious?
Not by itself. Ledger’s 2018 manual explicitly includes a genuine green PCB, revision 2. Other historical Nano S revisions were blue.
How many Ledger Nano S PCB revisions ?
Height labeled examples appear: revisions 1, 2, 3, 4, 5, 5 bis, 6 and 7. This is a collection of documented examples, not proof of a complete list of every manufactured variant.
Does a 12-pin or 15-pin screen indicate tampering?
No. Both are known original Nano S display connector variants. What matters is evidence of additional circuitry or an unexpected connection, not the number of pins by itself.
Can a display replacement cause a tampering warning?
A normal compatible screen replacement is a repair, not evidence of a malicious implant. Inspect the replacement module and any altered wiring, and compare the assembly with known-good references. Symetronix provides 12-pin and 15-pin display photos for the original Nano S.
Can a factory reset remove a malicious implant?
A software reset does not physically remove additional electronics. It also cannot revoke knowledge of recovery words already observed by an attacker. When a phrase may be exposed, move assets to addresses created with an entirely new phrase on a trusted device.
Has the specific Nano X screen implant been confirmed inside a Nano S?
The cited technical publications document Nano X examples. They establish a realistic failure mode for trusting a Genuine Check as proof of complete hardware integrity, but they do not establish that the identical design was deployed against the original Nano S.
Conclusion
The original Ledger Nano S has an advantage for anyone investigating its physical condition: Ledger published photographs of multiple genuine PCB revisions. Those images give you a useful starting point when you open a device and see something unexpected.
Compare like with like. Take good photographs, check the MCU marking and display ribbon, and pay attention to extra modules or connections that do not appear in the appropriate references. Remember that a successful Genuine Check only authenticates the Secure Element; it is not a certificate that the entire wallet has never been opened or altered.
If you also need to confirm the wallet’s cryptographic authenticity, use our companion guide: How to Check if Your Ledger Nano S Is Genuine. If you opened your Nano S because of a faulty display, the Symetronix screen identification guide explains the two connector types.
Sources and image credits
– Ledger Nano S User Manual, v1.0 (19 July 2018) — user’s PDF, pages 46–50, especially seven original PCB revision images on pages 47–49. PDF photos are indicated via editorial insertion placeholders.
– Ledger Donjon — Device Genuineness — Genuine Check limitations.
– Ledger — Best Practices To Securely Buy Your Ledger Signer — examples of tampered hardware and external illustrative photos.
– Ledger — Firmware 1.4 Deep Dive — historical MCU and firmware integrity context.
– HAKTECH VLOGS — Nano S Rev7 Teardown (2020) — independent revision 7 photo and inspection.
– Joe Grand / Grand Idea Studio — Nano X Hardware Implant — physical reverse engineering, Nano X model.
– Joe Grand’s X post provided for this research — the post could not be independently accessed, so no specific technical claims are attributed to it.
– Tibane Labs — Nano X Implant Research — further Nano X research; treat model distinctions carefully.
– Forbes — Fake Replacement Wallets (2021) — original reporting about counterfeit unsolicited devices.
– CoinDesk — Ledger Confirms Unauthorized Implant (12 October 2026) — at least one confirmed implant, without independently establishing the original Nano S as affected.
– YFarmX — CryptoBilis On-Chain Investigation — independent claims and estimates, distinguished from Ledger-confirmed findings.
– Help Net Security — Ledger Tampering Reports (12 October 2026) — contemporary distinction between confirmed and unverified reports.
– Symetronix — 12-pin and 15-pin Nano S screens — original Nano S screen variants and image assets.